Striped Street Cardigan Free Crochet Pattern
Striped Street Cardigan Free Crochet Pattern
Introduction
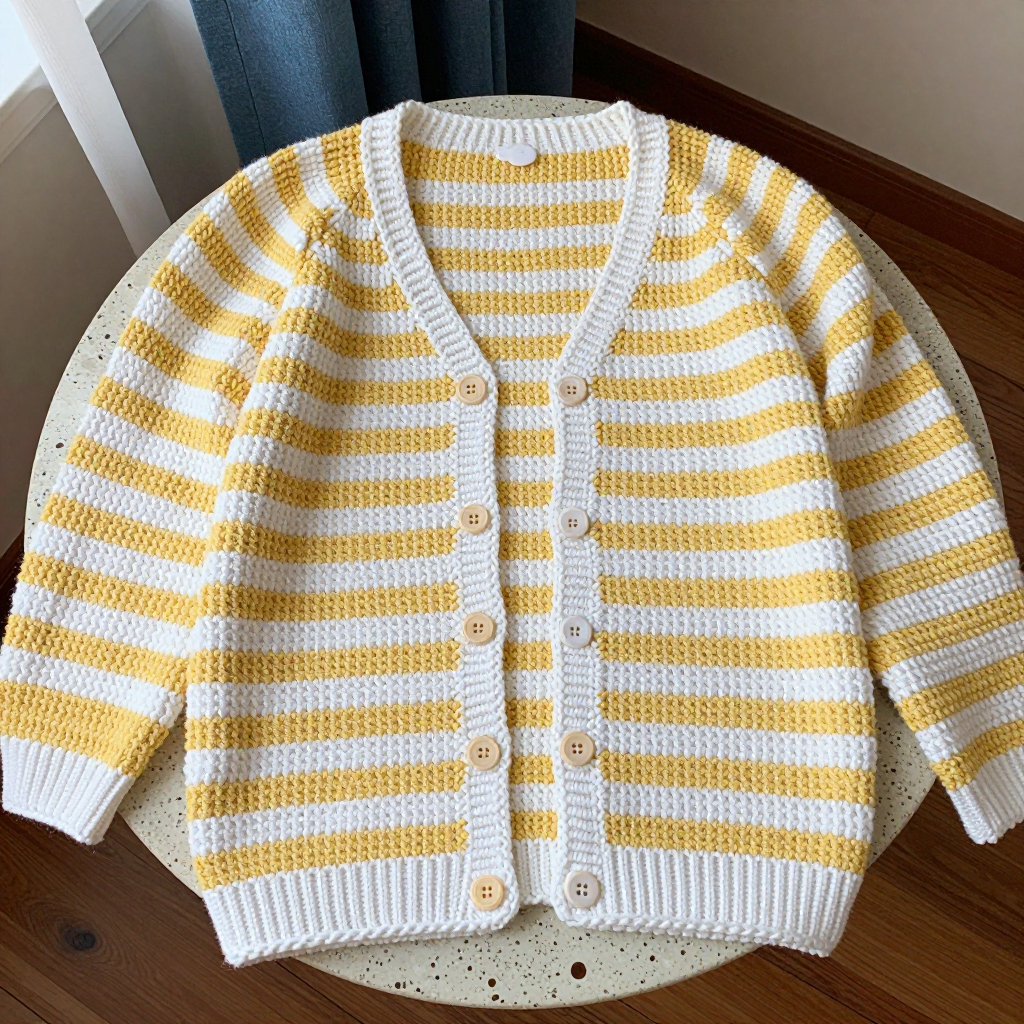
This striped street cardigan is the perfect project for anyone who loves a relaxed, boxy silhouette with a little retro flair. Worked in alternating bands of butter yellow and white, it has a cheerful, easygoing look that pairs beautifully with jeans, leggings, or a simple dress. The granny stripe texture gives it a soft, squishy feel, while the white ribbed hem and cuffs add a clean, classic finish. Whether you are new to garment making or a seasoned crocheter looking for a satisfying stripe sequence, this cardigan is a joy to stitch from the first row to the last button.
Materials Needed
- Yarn: Worsted weight (4) yarn, 100% acrylic, 200 yds (183 m) per 3.5 oz (100 g) skein.
- Color A (butter yellow): 4 (4, 5, 5, 6, 6, 7, 7, 8) skeins.
- Color B (white): 3 (3, 4, 4, 5, 5, 6, 6, 7) skeins.
- Hook: 4.5 mm (US 7) crochet hook.
- Notions: Tapestry needle, stitch markers, scissors, 5 (5, 6, 6, 7, 7, 8, 8, 9) buttons (about 0.75" / 2 cm diameter).
- Finished size: Chest: 30 (34, 38, 42, 46, 50, 54, 58, 62)" / 76 (86, 96.5, 106.5, 117, 127, 137, 147, 157.5) cm. Length: 22 (22.5, 23, 23.5, 24, 24.5, 25, 25.5, 26)" / 56 (57, 58.5, 59.5, 61, 62, 63.5, 65, 66) cm. Sleeve length to underarm: 18 (18, 18.5, 18.5, 19, 19, 19.5, 19.5, 20)" / 46 (46, 47, 47, 48, 48, 49.5, 49.5, 51) cm.
Abbreviations
- ch – chain
- dc – double crochet
- sc – single crochet
- sp – space
- st(s) – stitch(es)
- beg – beginning
- rep – repeat
- RS – right side
- WS – wrong side
- inc – increase (work 2 dc in the same stitch)
- cluster – a group of 3 dc worked as described in the pattern
Gauge
16 sts and 8 rows = 4" (10 cm) over the granny stripe pattern. To check your gauge, crochet a small swatch in pattern and measure a 4" section in both directions; adjust your hook size if needed to match.
Tips Before You Start
- Keep your color changes tidy: Change color at the end of the row by finishing the last stitch with the new color, then carry the unused yarn loosely up the side. This keeps the stripes crisp and the edges neat.
- Count your clusters: The pattern relies on a consistent number of 3-dc clusters. Place a stitch marker at the beginning of each section after the armhole divide so you never lose your place.
- Try it on as you go: Because the body is worked in one piece, you can hold the piece against yourself after the divide to check the armhole depth before fastening off.
- Block before seaming: Lightly steam or wet-block the body and sleeves before assembly so the granny stripe texture relaxes and the edges lie flat for easier sewing.
Step-by-Step Instructions
Body (worked in one piece from the bottom up)
Note: Work in groups of 3 dc (cluster) with ch 1 between clusters. Color sequence: 2 rows A, 2 rows B, repeat. Change color at the end of the row.
Row 1: With B, ch 122 (138, 154, 170, 186, 202, 218, 234, 250). Dc in 4th ch from hook (counts as first dc), dc in next 2 ch, *ch 1, skip 1 ch, dc in next 3 ch; rep from * to last 4 ch, ch 1, skip 1 ch, dc in last 3 ch. Turn. (30 (34, 38, 42, 46, 50, 54, 58, 62) clusters)
Row 2: Ch 3 (counts as first dc), dc in next 2 dc, *ch 1, skip ch-1 sp, dc in next 3 dc; rep from * across, ending with dc in last 3 dc. Turn.
Rows 3–end of body: Rep Row 2, changing colors every 2 rows following the color sequence, until piece measures 13 (13, 13.5, 13.5, 14, 14, 14.5, 14.5, 15)" from beg, ending with a WS row.
Divide for Armholes
Next row (RS): Work in pattern over first 6 (7, 8, 9, 10, 11, 12, 13, 14) clusters (left front), ch 1, skip next 2 clusters (underarm), work in pattern over next 14 (16, 18, 20, 22, 24, 26, 28, 30) clusters (back), ch 1, skip next 2 clusters (underarm), work in pattern over last 6 (7, 8, 9, 10, 11, 12, 13, 14) clusters (right front). Turn.
Left Front
Rows 1–end: Continue in pattern over 6 (7, 8, 9, 10, 11, 12, 13, 14) clusters until armhole measures 6 (6.5, 7, 7.5, 8, 8.5, 9, 9.5, 10)", ending with a WS row. Fasten off.
Back
Rows 1–end: With RS facing, join yarn to first cluster of back. Work in pattern over 14 (16, 18, 20, 22, 24, 26, 28, 30) clusters until armhole measures same as left front, ending with a WS row. Fasten off.
Right Front
Rows 1–end: With RS facing, join yarn to first cluster of right front. Work in pattern over 6 (7, 8, 9, 10, 11, 12, 13, 14) clusters until armhole measures same as left front, ending with a WS row. Fasten off.
Sleeves (make 2)
Row 1: With B, ch 38 (38, 44, 44, 50, 50, 56, 56, 62). Dc in 4th ch from hook, dc in next 2 ch, *ch 1, skip 1 ch, dc in next 3 ch; rep from * to last 4 ch, ch 1, skip 1 ch, dc in last 3 ch. Turn. (9 (9, 11, 11, 13, 13, 15, 15, 17) clusters)
Row 2: Ch 3, dc in next 2 dc, *ch 1, skip ch-1 sp, dc in next 3 dc; rep from * across, ending with dc in last 3 dc. Turn.
Rows 3–end: Rep Row 2, changing colors every 2 rows, AT THE SAME TIME inc 1 cluster at each end every 4th row 6 (7, 7, 8, 8, 9, 9, 10, 10) times as follows: work 2 dc in first dc, work in pattern to last dc, 2 dc in last dc. (21 (23, 25, 27, 29, 31, 33, 35, 37) clusters)
Work even until sleeve measures 18 (18, 18.5, 18.5, 19, 19, 19.5, 19.5, 20)" from beg, ending with a WS row. Fasten off.
Edging
With B, join yarn at bottom right corner of right front. Work sc evenly up right front, around back neck, and down left front, working 3 sc in each corner. Fasten off. Sew 5 (5, 6, 6, 7, 7, 8, 8, 9) buttons evenly spaced along left front, using sc spaces as buttonholes.
Hem
With B, join yarn at bottom edge. Work 1 row sc evenly around bottom edge, then work 3 rows in ribbed pattern (sc in back loop only). Fasten off.
Cuffs
With B, join yarn at sleeve edge. Work 1 row sc evenly around, then work 3 rows in ribbed pattern (sc in back loop only). Fasten off.
Assembly and Finishing
Sew shoulder seams. Sew sleeves into armholes, matching the center of each sleeve to the shoulder seam. Sew side and sleeve seams. Weave in all ends. Block the finished cardigan by misting lightly with water and pinning to the finished measurements, then allow it to dry completely before wearing.
Pro Tips and Variations
- Change the stripe rhythm: Try 3 rows of Color A and 1 row of Color B for a bolder, more graphic look, or use a single contrast color for the hem, cuffs, and edging to make them pop.
- Add pockets: Work two simple square pockets in the granny stripe pattern and sew them onto the lower fronts before adding the edging.
- Make it longer: Add extra pattern rows before the armhole divide to create a longer, tunic-style cardigan—just remember to adjust your yarn quantities accordingly.