Rust & Forest Mandala Crochet Pillow Free Pattern
Introduction
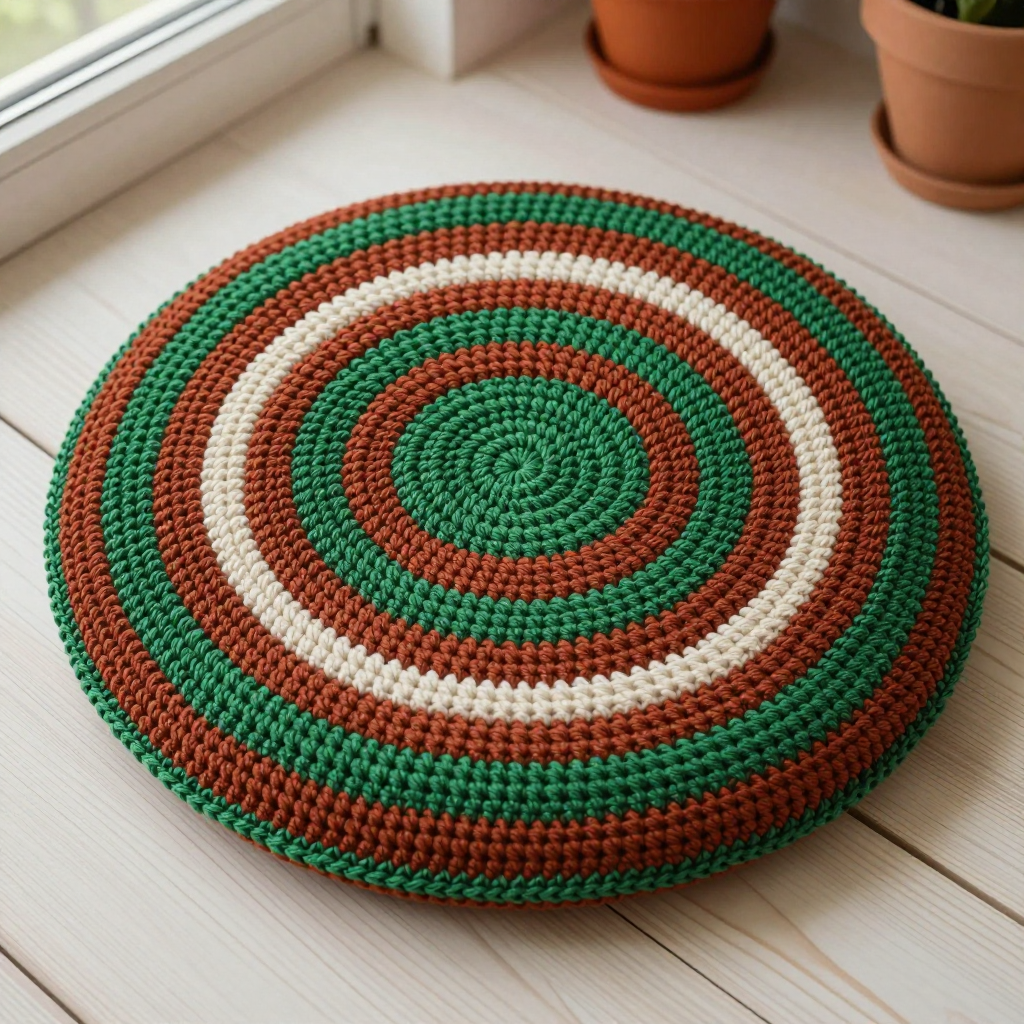
This Rust & Forest Mandala Pillow is a warm, earthy accent piece that brings a little woodland calm to any room. It's written for intermediate crocheters who are comfortable with double crochet and color changes, but the stitches themselves are simple and soothing to work. The front is a round mandala of concentric rings, alternating bands of forest green and rust, while the back stays plain forest green for a clean, modern look. At about 14 inches across, it looks softly rounded and feels light and squishy, perfect for a chair, a reading nook, or a handmade gift.
Materials Needed
- Yarn: DK weight (3) yarn, cotton or acrylic. Forest green (MC): 200 yards. Rust (CC): 150 yards.
- Hook: 3.75 mm (F/5), or the size needed to match gauge.
- Notions: Stitch marker, tapestry needle, scissors, and a small amount of polyester fiberfill or pillow stuffing.
- Finished size: Approximately 14 inches in diameter.
Abbreviations
- MC – main color (forest green)
- CC – contrasting color (rust)
- MR – magic ring
- dc – double crochet
- sc – single crochet
- inc – increase (work 2 dc in the same stitch)
- sts – stitches
- rnd(s) – round(s)
Gauge
20 sts and 20 rnds = 4 inches in double crochet. Work a small swatch in the round and measure the center of the fabric; if your gauge is off, change hook size until it matches.
Tips Before You Start
- Count your stitches at the end of every round. Each round adds 12 stitches, so a quick count keeps the circle flat and even.
- Change colors on the last yarn-over of the final stitch of a round so the new color begins cleanly.
- Keep your tension relaxed and consistent; tight stitches make the disc cup instead of lying flat.
- Use a stitch marker in the first stitch of each round so you never lose your place.
Step-by-Step Instructions
Front (Mandala)
Work in joined rounds with MC unless told to change color.
Rnd 1: MR, 12 dc into the ring, join (12 sts).
Rnd 2: inc x12 (24 sts).
Rnd 3: [dc, inc] x12 (36 sts).
Rnd 4: [2 dc, inc] x12 (48 sts).
Rnd 5: [3 dc, inc] x12 (60 sts). Change to CC.
Rnd 6: [4 dc, inc] x12 (72 sts).
Rnd 7: [5 dc, inc] x12 (84 sts).
Rnd 8: [6 dc, inc] x12 (96 sts). Change to MC.
Rnd 9: [7 dc, inc] x12 (108 sts).
Rnd 10: [8 dc, inc] x12 (120 sts).
Rnd 11: [9 dc, inc] x12 (132 sts). Change to CC.
Rnd 12: [10 dc, inc] x12 (144 sts).
Rnd 13: [11 dc, inc] x12 (156 sts).
Rnd 14: [12 dc, inc] x12 (168 sts). Change to MC.
Rnd 15: [13 dc, inc] x12 (180 sts).
Rnd 16: [14 dc, inc] x12 (192 sts).
Rnd 17: [15 dc, inc] x12 (204 sts). Change to CC.
Rnd 18: [16 dc, inc] x12 (216 sts).
Rnd 19: [17 dc, inc] x12 (228 sts).
Rnd 20: [18 dc, inc] x12 (240 sts). Fasten off.
Back (Plain)
Work entirely in MC.
Rnd 1: MR, 12 dc into the ring, join (12 sts).
Rnd 2: inc x12 (24 sts).
Rnd 3: [dc, inc] x12 (36 sts).
Rnd 4: [2 dc, inc] x12 (48 sts).
Rnd 5: [3 dc, inc] x12 (60 sts).
Rnd 6: [4 dc, inc] x12 (72 sts).
Rnd 7: [5 dc, inc] x12 (84 sts).
Rnd 8: [6 dc, inc] x12 (96 sts).
Rnd 9: [7 dc, inc] x12 (108 sts).
Rnd 10: [8 dc, inc] x12 (120 sts).
Rnd 11: [9 dc, inc] x12 (132 sts).
Rnd 12: [10 dc, inc] x12 (144 sts).
Rnd 13: [11 dc, inc] x12 (156 sts).
Rnd 14: [12 dc, inc] x12 (168 sts).
Rnd 15: [13 dc, inc] x12 (180 sts).
Rnd 16: [14 dc, inc] x12 (192 sts).
Rnd 17: [15 dc, inc] x12 (204 sts).
Rnd 18: [16 dc, inc] x12 (216 sts).
Rnd 19: [17 dc, inc] x12 (228 sts).
Rnd 20: [18 dc, inc] x12 (240 sts). Fasten off.
Joining Edge
Place the front and back wrong sides together, matching the outer edges. Join MC with sc through both layers, work sc evenly around the entire perimeter, and stuff lightly with fiberfill before closing the final gap. Fasten off.
Assembly and Finishing
Align the two discs so the mandala front faces outward and the edges match all the way around. Work the single crochet joining round through both layers, pausing about three-quarters of the way around to add stuffing a little at a time until the pillow is softly full but still flat. Close the seam, then weave in all ends on the wrong side. Lightly steam or mist block the finished pillow, shaping it into a neat circle and letting it dry flat.
Pro Tips and Variations
- Swap rust for mustard or terracotta to suit your room's palette.
- Add a second sc round in CC around the edge for a bolder border.
- Use a slightly larger hook for a looser, drapier pillow, or add a fabric backing for extra structure.