Hallow's Eve Granny Hand Warmers: Free Crochet Pattern
Introduction
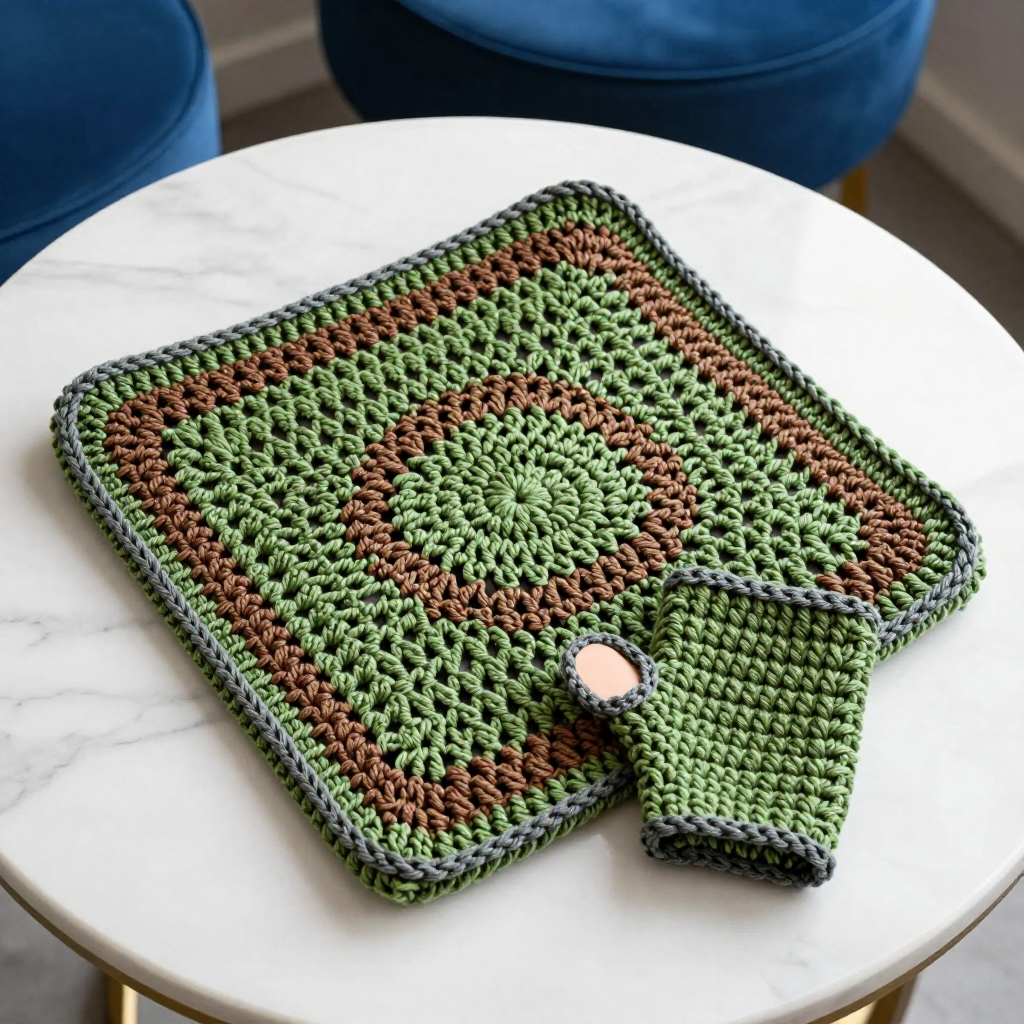
These Hallow's Eve Granny Hand Warmers are the perfect little project for anyone who loves classic granny squares but wants something a bit more wearable. Each hand warmer is made from just one large granny square, folded and seamed into a cozy tube with a thumb slit, so the construction is simple and beginner-friendly. The lacy, open texture of the granny clusters keeps them light and breathable, while the moss and lichen color palette gives a subtle nod to Halloween without being costume-y. Slip them on and you'll feel that soft, slightly stretchy sock-yarn fabric hug your hands just right.
Materials Needed
- Yarn: Fingering weight (14 wpi) self-striping sock yarn, 75% superwash wool, 25% nylon, 400 yd (366 m) per 100 g skein.
- Color A (Moss, green-brown variegated): 1 skein, approx 180 yd used
- Color B (Lichen, gray-green solid): 1 skein, approx 20 yd used
- Hook: 3.5 mm (US E/4) crochet hook
- Notions: Tapestry needle, stitch markers, scissors, tape measure
- Finished size: To fit teen hand circumference 6.5–7.5" (16.5–19 cm). Finished circumference 7" (18 cm), length 6.5" (16.5 cm).
Abbreviations
- ch — chain
- sl st — slip stitch
- sc — single crochet
- dc — double crochet
- sp — space
- RS / WS — right side / wrong side
- [ ] — repeat the instructions inside the brackets the number of times stated
Gauge
20 sts and 10 rows in granny square pattern = 4" (10 cm) after blocking. To check, work a small swatch of granny clusters and measure a 4" section; adjust your hook size if needed to match.
Tips Before You Start
- Keep your ch-1 spaces consistent — they create the lacy look and affect the final square size.
- Because the yarn is self-striping, let the colors flow naturally; don't cut to match stripes.
- Mark your corner ch-2 spaces with stitch markers so you never lose your place in the growing rounds.
- Make both squares before seaming so you can compare size and mirror the thumb opening accurately.
Step-by-Step Instructions
Granny Square (make 2, Color A)
Set-up: Ch 4, join with sl st to form ring.
R1: Ch 3 (counts as dc), 2 dc in ring, [ch 2, 3 dc in ring] 3 times, ch 2, join with sl st to top of ch-3. (12 dc, 4 ch-2 sps)
R2: Sl st to next ch-2 sp, ch 3, 2 dc in same sp, ch 2, 3 dc in same sp (corner made), *ch 1, (3 dc, ch 2, 3 dc) in next ch-2 sp; rep from * 2 more times, ch 1, join with sl st to top of ch-3. (24 dc, 4 ch-1 sps)
R3: Sl st to next ch-2 sp, ch 3, 2 dc in same sp, ch 2, 3 dc in same sp, *ch 1, 3 dc in next ch-1 sp, ch 1, (3 dc, ch 2, 3 dc) in next ch-2 sp; rep from * 2 more times, ch 1, 3 dc in next ch-1 sp, ch 1, join with sl st to top of ch-3. (36 dc, 8 ch-1 sps)
R4: Sl st to next ch-2 sp, ch 3, 2 dc in same sp, ch 2, 3 dc in same sp, *[ch 1, 3 dc in next ch-1 sp] twice, ch 1, (3 dc, ch 2, 3 dc) in next ch-2 sp; rep from * 2 more times, [ch 1, 3 dc in next ch-1 sp] twice, ch 1, join with sl st to top of ch-3. (48 dc, 12 ch-1 sps)
R5: Sl st to next ch-2 sp, ch 3, 2 dc in same sp, ch 2, 3 dc in same sp, *[ch 1, 3 dc in next ch-1 sp] 3 times, ch 1, (3 dc, ch 2, 3 dc) in next ch-2 sp; rep from * 2 more times, [ch 1, 3 dc in next ch-1 sp] 3 times, ch 1, join with sl st to top of ch-3. (60 dc, 16 ch-1 sps)
R6: Sl st to next ch-2 sp, ch 3, 2 dc in same sp, ch 2, 3 dc in same sp, *[ch 1, 3 dc in next ch-1 sp] 4 times, ch 1, (3 dc, ch 2, 3 dc) in next ch-2 sp; rep from * 2 more times, [ch 1, 3 dc in next ch-1 sp] 4 times, ch 1, join with sl st to top of ch-3. (72 dc, 20 ch-1 sps)
R7: Sl st to next ch-2 sp, ch 3, 2 dc in same sp, ch 2, 3 dc in same sp, *[ch 1, 3 dc in next ch-1 sp] 5 times, ch 1, (3 dc, ch 2, 3 dc) in next ch-2 sp; rep from * 2 more times, [ch 1, 3 dc in next ch-1 sp] 5 times, ch 1, join with sl st to top of ch-3. (84 dc, 24 ch-1 sps)
R8: Sl st to next ch-2 sp, ch 3, 2 dc in same sp, ch 2, 3 dc in same sp, *[ch 1, 3 dc in next ch-1 sp] 6 times, ch 1, (3 dc, ch 2, 3 dc) in next ch-2 sp; rep from * 2 more times, [ch 1, 3 dc in next ch-1 sp] 6 times, ch 1, join with sl st to top of ch-3. (96 dc, 28 ch-1 sps)
R9: Sl st to next ch-2 sp, ch 3, 2 dc in same sp, ch 2, 3 dc in same sp, *[ch 1, 3 dc in next ch-1 sp] 7 times, ch 1, (3 dc, ch 2, 3 dc) in next ch-2 sp; rep from * 2 more times, [ch 1, 3 dc in next ch-1 sp] 7 times, ch 1, join with sl st to top of ch-3. (108 dc, 32 ch-1 sps)
R10: Sl st to next ch-2 sp, ch 3, 2 dc in same sp, ch 2, 3 dc in same sp, *[ch 1, 3 dc in next ch-1 sp] 8 times, ch 1, (3 dc, ch 2, 3 dc) in next ch-2 sp; rep from * 2 more times, [ch 1, 3 dc in next ch-1 sp] 8 times, ch 1, join with sl st to top of ch-3. (120 dc, 36 ch-1 sps)
Fasten off. Square measures approx 10" (25.5 cm) across.
Border (Color B)
With RS facing, join B with sl st to any corner ch-2 sp.
R1: Ch 1, sc in same sp, *sc in each dc and ch-1 sp across to next corner ch-2 sp, (sc, ch 2, sc) in corner ch-2 sp; rep from * around, join with sl st to first sc. (124 sc, 4 ch-2 sps)
R2: Ch 1, sc in each sc around, (sc, ch 2, sc) in each corner ch-2 sp, join with sl st to first sc. (132 sc, 4 ch-2 sps)
Fasten off. Weave in ends.
Assembly (each hand warmer)
Fold square in half with WS together, matching corners to form a rectangle 10" x 5" (25.5 x 12.5 cm).
Seam one short side (side A) from fold to outer edge, leaving a 1.5" (4 cm) opening for the thumb near the fold. Seam the opposite short side (side B) completely. This creates a tube with a thumb slit.
Turn RS out.
Thumb Edging (Color B)
Join B with sl st to thumb opening edge.
R1: Ch 1, sc evenly around thumb opening, join with sl st to first sc. (approx 20 sc)
R2: Ch 1, sc in each sc around, join with sl st to first sc. (20 sc)
Fasten off. Weave in ends.
Repeat the assembly and edging for the second hand warmer, reversing the thumb opening placement (mirror image).
Assembly and Finishing
Use a tapestry needle and a length of Color A to whipstitch or mattress-stitch the short sides, keeping the seam flat and neat. Weave in all ends on the wrong side, then block each hand warmer lightly to the finished measurements (7" circumference, 6.5" length) by misting with water and pinning to shape. Let dry completely before wearing.
Pro Tips and Variations
- Swap Color B for a deep charcoal or pumpkin orange for a bolder Halloween accent.
- Add a third sc round to the thumb edging for a slightly firmer, more finished opening.
- Work the square in a solid color for a minimalist everyday pair, or use a contrasting border for a pop of color.