Rust Lattice Ring Garter: Free Crochet Pattern
Introduction
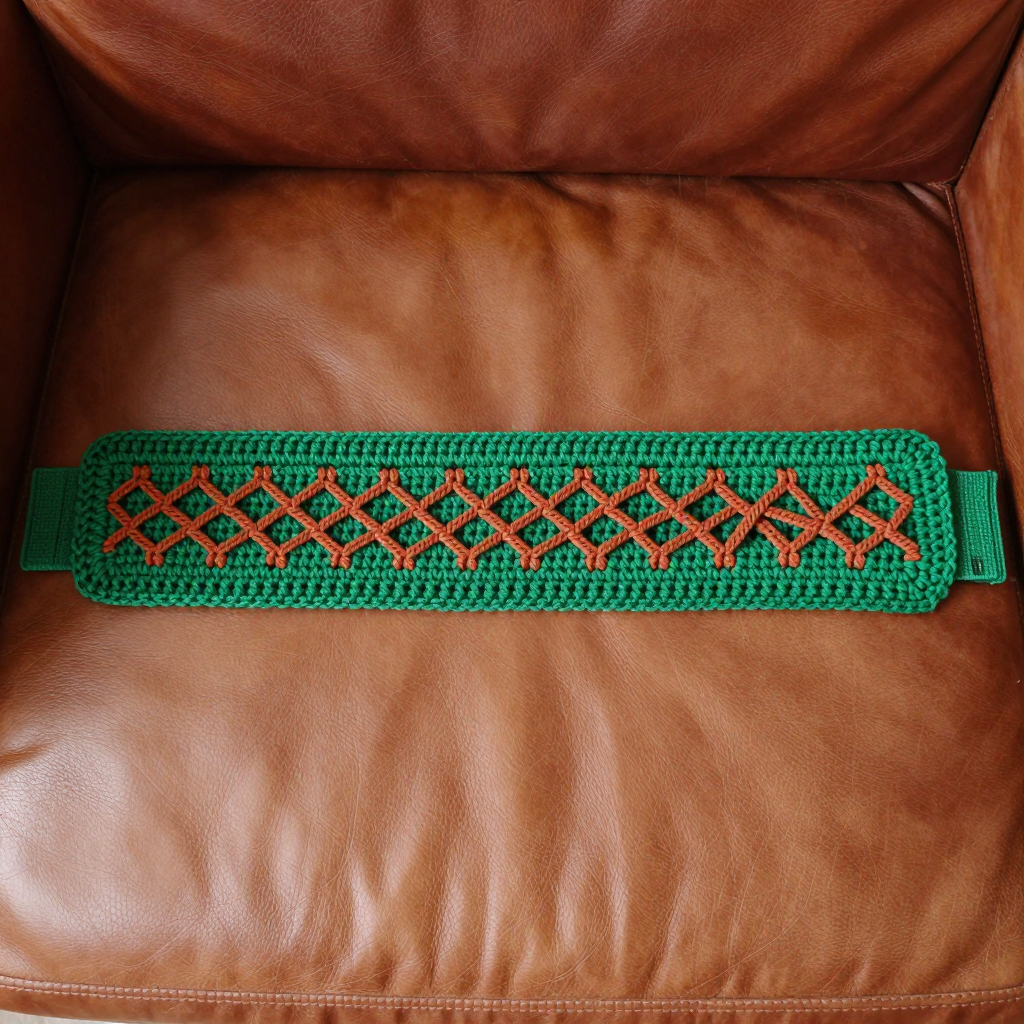
This Rust Lattice Ring Garter is a small project with a big mid-century-modern personality. It's written for crocheters who are comfortable with single crochet and chains and want to try something a little more detailed, but every step is spelled out so a confident beginner can follow along. The narrow forest green band is dense and smooth, and the rust lattice of long chain loops floats over the outer face like a little architectural grid. It feels crisp and lightweight against the skin, and the snap tab lets you adjust the fit so it stays put all day.
Materials Needed
- Yarn: Size 10 crochet thread (lace weight), 100% cotton. Forest green (A): 50 yd. Rust (B): 20 yd.
- Hook: 1.5 mm steel hook (US 8).
- Notions: Tapestry or sewing needle for weaving in ends, matching sewing thread, one sew-on snap fastener, scissors.
- Finished size: Band circumference 18 inches (46 cm), width 1 inch (2.5 cm); adjustable via the snap tab.
Abbreviations
- ch — chain: wrap the thread over the hook and pull it through the loop on your hook.
- sc — single crochet: insert hook in stitch, pull up a loop, yarn over, pull through both loops.
- sl st — slip stitch: insert hook in stitch, yarn over, pull through both the stitch and the loop on your hook.
- sk — skip: leave the next stitch unworked.
- sp — space: the opening made by a chain (here, a ch-5 space).
- st(s) — stitch(es).
- beg — beginning.
- rep — repeat.
Gauge
32 sc and 36 rows = 4 inches (10 cm) in single crochet. Work a small swatch in single crochet and measure the center of it; if you have more stitches than 32 per 4 inches, go up a hook size, and if you have fewer, go down.
Tips Before You Start
- Thread crochet is worked tightly — keep your tension relaxed so the 144-stitch rows stay even and the band doesn't curl.
- Count your stitches at the end of every band row; the lattice depends on the band being exactly 144 stitches wide.
- When working the lattice, keep the ch-5 loops loose and even so they lie flat over the green band instead of pulling it in.
- Test the snap placement on your wrist before sewing the tab down, so the finished garter closes at a comfortable fit.
Step-by-Step Instructions
Band (Color A)
Row 1: Ch 145, sc in 2nd ch from hook and in each ch across (144 sc).
Rows 2-4: Ch 1, turn, sc in each st across (144 sc). Do not fasten off.
Lattice (Color B)
Row 5: Join B with sl st at the beginning of Row 4, ch 1, sc in first sc, *ch 5, sk 3 sc, sc in next sc; rep from * across, ending with sc in last sc (36 loops).
Row 6: Ch 1, turn, sc in first sc, *ch 5, sc in next ch-5 sp; rep from * across, ending with sc in last sc (36 loops). Fasten off B.
Edging (Color A)
Edging round: Join A at the end of Row 6, ch 1, sc evenly around the entire outer edge, working 1 sc in each st and 1 sc in each ch-5 sp along the sides, and 3 sc in each corner. Join with sl st to first sc. Fasten off.
Snap Tab (Color A)
Row 1: Ch 9, sc in 2nd ch from hook and in each ch across (8 sc).
Rows 2-3: Ch 1, turn, sc in each st across (8 sc). Fasten off, leaving a 6-inch tail.
Assembly and Finishing
Sew one half of the snap to the center of the snap tab. Sew the matching half to the corresponding position on one end of the band. Sew the tab to the opposite band end. Weave in all ends on the wrong side, then gently steam-block the band flat, pressing the lattice loops lightly so they lie evenly. Let it dry completely before fastening the snap.
Pro Tips and Variations
- Swap the rust lattice for a mustard or teal thread to change the mid-century palette without altering the pattern.
- For a wider band, add two more single crochet rows before the lattice and adjust the edging to match.
- Use a hook-and-loop dot instead of a snap for a quicker, fully adjustable closure.