Sunburst Shield Crochet Wall Hanging Free Pattern
Introduction
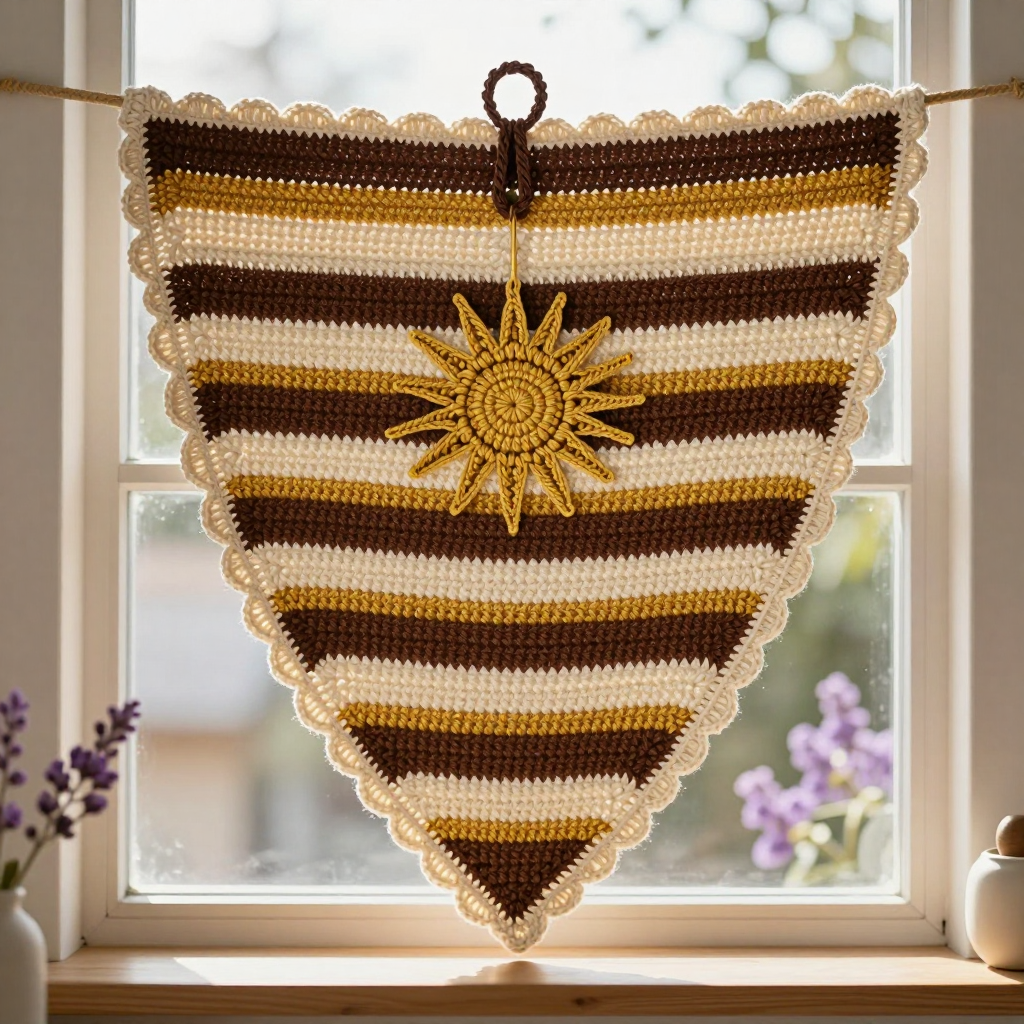
The Sunburst Shield Wall Hanging is a beginner-friendly crochet project that brings a little 1970s sunshine into your home. It is a flat triangular shield worked top-down in bold stripes of brown, cream, and gold, finished with a soft scalloped border and a round sunburst medallion sewn at its center. It is perfect for anyone who has mastered the basic double crochet and wants a quick, satisfying decor piece. The finished hanging is dense and sturdy, with visible horizontal ridges and a warm vintage feel that looks lovely above a desk, in a hallway, or in a nursery.
Materials Needed
- Yarn: Worsted weight (Category 4) cotton yarn — Color A (brown) 100 yd, Color B (cream) 80 yd, Color C (gold) 50 yd
- Hook: 5.0 mm (H-8) crochet hook
- Notions: Tapestry needle, scissors, stitch marker (optional), measuring tape
- Finished size: Approx. 12 inches (30.5 cm) wide at the top and 18 inches (45.7 cm) long from top to point, excluding the hanging loop
Abbreviations
- ch — chain
- sc — single crochet
- dc — double crochet
- dc2tog — double crochet two stitches together (a decrease)
- sk — skip
- sp / sps — space / spaces
- st / sts — stitch / stitches
- sl st — slip stitch
- rep — repeat
- rnd — round
Gauge
16 sts and 8 rows in dc = 4 inches (10 cm). Work a small swatch in double crochet and measure it flat; if your stitches are larger or smaller, change hook size until the gauge matches.
Tips Before You Start
- Change colors in the last stitch of the previous row so the new stripe starts cleanly at the beginning of the next row.
- Keep your tension even on the decrease rows — the shield narrows in steps, and loose stitches will make the sides wavy.
- Count your stitches at the end of every row; the counts drop quickly, and an error is easiest to fix right away.
- Work the scallop edging with a relaxed hand so the border lies flat instead of cupping.
Step-by-Step Instructions
Shield (worked top-down in alternating stripes)
With A, ch 49.
Row 1: Dc in 4th ch from hook and in each ch across, turn (46 dc).
Row 2: Ch 3 (counts as first dc), dc in next 2 dc, *dc2tog, dc in next 3 dc; rep from * to last 3 dc, dc in last 3 dc, turn (38 dc).
Row 3: Ch 3, dc in next 2 dc, *dc2tog, dc in next 2 dc; rep from * to last 3 dc, dc in last 3 dc, turn (30 dc).
Row 4: Ch 3, dc in next 2 dc, *dc2tog, dc in next dc; rep from * to last 3 dc, dc in last 3 dc, turn (22 dc).
Row 5: Ch 3, dc in next 2 dc, *dc2tog; rep from * to last 3 dc, dc in last 3 dc, turn (14 dc).
Row 6: Ch 3, dc in next 2 dc, dc2tog, dc in next 2 dc, dc2tog, dc in last 3 dc, turn (12 dc).
Row 7: Ch 3, dc in next 2 dc, dc2tog, dc in next 2 dc, dc2tog, dc in last 3 dc, turn (10 dc).
Row 8: Ch 3, dc in next 2 dc, dc2tog, dc in next 2 dc, dc2tog, dc in last 3 dc, turn (8 dc).
Row 9: Ch 3, dc in next 2 dc, dc2tog, dc in next 2 dc, dc2tog, dc in last 3 dc, turn (6 dc).
Row 10: Ch 3, dc in next 2 dc, dc2tog, dc in last 3 dc, turn (5 dc).
Row 11: Ch 3, dc in next 2 dc, dc2tog, dc in last 2 dc, turn (4 dc).
Row 12: Ch 3, dc in next dc, dc2tog, dc in last dc, turn (3 dc).
Row 13: Ch 3, dc2tog, dc in last dc, turn (2 dc).
Row 14: Ch 3, dc2tog, turn (1 dc).
Fasten off.
Color changes: Work rows 1–2 in A, rows 3–4 in B, rows 5–6 in C, rows 7–8 in A, rows 9–10 in B, rows 11–12 in C, rows 13–14 in A. Change color in the last st of the previous row.
Edging (scallop)
With right side facing, join B at the top right corner of the shield.
Rnd 1: Sc evenly around the entire shield, working 3 sc in each corner, join with sl st to first sc.
Rnd 2: Ch 1, *sc in next 2 sc, sk next sc, 5 dc in next sc, sk next sc; rep from * around, adjusting to end with sc in last sc, join with sl st to first sc. Fasten off.
Hanging Loop
With A, ch 20, join with sl st to form a ring. Sc in each ch around, join with sl st to first sc. Fasten off. Sew the loop to the top center of the shield.
Sunburst Appliqué (make 1)
With C, make a magic ring.
Rnd 1: Ch 3 (counts as first dc), 11 dc in ring, join with sl st to top of ch-3 (12 dc).
Rnd 2: Ch 1, sc in same st, *ch 3, sk next dc, sc in next dc; rep from * around, join with sl st to first sc (6 ch-3 sps).
Rnd 3: Sl st in first ch-3 sp, ch 3, 2 dc in same sp, *ch 1, 3 dc in next ch-3 sp; rep from * around, join with sl st to top of ch-3 (18 dc, 6 ch-1 sps).
Rnd 4: Ch 1, sc in same st, *ch 4, sk next dc, sc in next dc; rep from * around, join with sl st to first sc (9 ch-4 sps).
Rnd 5: Sl st in first ch-4 sp, ch 3, 3 dc in same sp, *ch 1, 4 dc in next ch-4 sp; rep from * around, join with sl st to top of ch-3 (36 dc, 9 ch-1 sps).
Rnd 6: Ch 1, sc in same st, *ch 5, sk next dc, sc in next dc; rep from * around, join with sl st to first sc (12 ch-5 sps).
Rnd 7: Sl st in first ch-5 sp, ch 3, 4 dc in same sp, *ch 1, 5 dc in next ch-5 sp; rep from * around, join with sl st to top of ch-3 (60 dc, 12 ch-1 sps).
Fasten off, leaving a long tail for sewing.
Assembly and Finishing
Sew the sunburst appliqué to the center of the shield using the photo as a guide, stitching around the inner solid round with the long tail. Weave in all ends on the wrong side, then block lightly: mist the hanging, pin it flat to the finished measurements, and let it dry completely before hanging.
Pro Tips and Variations
- Swap the color order for a different mood — try cream, gold, brown for a lighter, sandier look.
- Add a small wooden dowel or twig through the top loop for a rustic display.
- Make a mini version by starting with a shorter chain and working fewer decrease rows for a set of matching wall accents.