Crochet Astronaut Helmet Bauble Free Pattern
Introduction
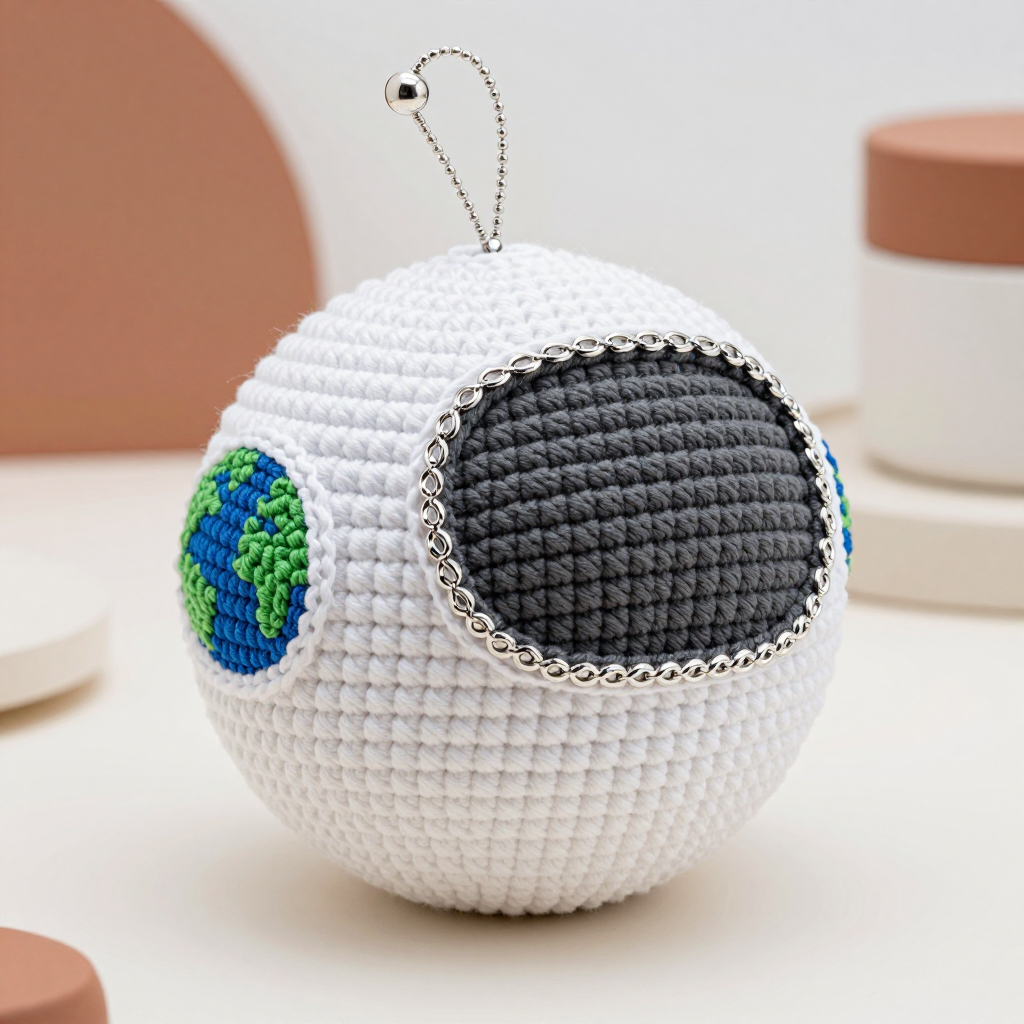
This little astronaut helmet bauble is a fun, space-themed twist on a classic Christmas ornament, and it is perfect for anyone who loves amigurumi, space, or a slightly different holiday decoration. Worked in soft DK yarn, the white sphere is shaped with simple increases and decreases, then dressed up with a dark visor, a tiny antenna, and a little blue-and-green Earth on the side. At about 3 inches (7.5 cm) across, it is small enough to hang on a tree or a backpack but detailed enough to make people smile. The finished bauble is firm, round, and light, with a smooth single-crochet surface that shows off the color changes beautifully.
Materials Needed
- Yarn: DK weight (3) yarn. White (A) 30 yd, dark grey (B) 10 yd, silver (C) 5 yd, blue (D) 2 yd, green (E) 2 yd. Acrylic or cotton both work well.
- Hook: 2.75 mm (US C/2) crochet hook.
- Notions: Stitch marker, tapestry needle, polyester fiberfill for stuffing, one small bead (or embroidery floss for a French knot) for the antenna tip, scissors.
- Finished size: Approximately 3 inches (7.5 cm) diameter.
Abbreviations
- MR – magic ring: an adjustable loop you crochet into to start a round.
- sc – single crochet: insert hook, pull up a loop, yarn over, pull through both loops.
- inc – increase: work 2 single crochet stitches into the same stitch.
- dec – decrease: work 2 stitches together into 1 (invisible decrease recommended).
- ch – chain.
- sl st – slip stitch: insert hook, yarn over, pull through both loops and the loop on the hook.
- st(s) – stitch(es).
- FO – fasten off.
Gauge
24 single crochet stitches and 24 rows = 4 inches (10 cm). To check, crochet a small flat swatch in single crochet and measure a 4-inch section; adjust your hook size if your stitches are much larger or smaller than this.
Tips Before You Start
- Use a stitch marker in the first stitch of each round so you never lose your place in the continuous spiral.
- Stuff the helmet firmly but in small pieces as you close the opening, so the sphere stays round and does not dent.
- Work the visor and Earth pieces first and pin them in place before sewing, so you can adjust the placement to look centered.
- Keep your tension even on the color changes; give the yarn a gentle tug when you switch colors to avoid gaps.
Step-by-Step Instructions
Helmet (Yarn A)
Rnd 1: MR, 6 sc (6 sts).
Rnd 2: inc x6 (12 sts).
Rnd 3: [sc, inc] x6 (18 sts).
Rnd 4: [2 sc, inc] x6 (24 sts).
Rnd 5: [3 sc, inc] x6 (30 sts).
Rnd 6: [4 sc, inc] x6 (36 sts).
Rnd 7: [5 sc, inc] x6 (42 sts).
Rnds 8-14: sc in each st around (42 sts).
Rnd 15: [5 sc, dec] x6 (36 sts).
Rnd 16: [4 sc, dec] x6 (30 sts).
Rnd 17: [3 sc, dec] x6 (24 sts).
Rnd 18: [2 sc, dec] x6 (18 sts).
Stuff firmly.
Rnd 19: [sc, dec] x6 (12 sts).
Rnd 20: dec x6 (6 sts).
FO, weave the tail through the remaining 6 stitches and pull closed.
Visor (Yarn B)
With B, ch 9.
Row 1: sc in 2nd ch from hook and in each ch across (8 sts).
Rows 2-6: sc in each st across (8 sts).
FO, leaving a long tail for sewing. Sew the visor to the front of the helmet over Rnds 8-14, centered.
Antenna (Yarn C)
With C, ch 6.
Row 1: sl st in 2nd ch from hook and in each ch across (5 sl sts).
FO, leaving a tail. Sew one end to the top of the helmet. Attach a small bead or work a French knot at the tip.
Earth (Yarns D and E)
With D, MR, 6 sc (6 sts).
Rnd 2: inc x6 (12 sts).
Change to E.
Rnd 3: [sc, inc] x6 (18 sts).
FO, leaving a tail. Sew the Earth to the side of the helmet.
Hanging Loop (Yarn C)
With C, ch 10, sl st to the first ch to form a ring. FO, leaving a tail, and sew the loop to the top of the helmet.
Edging (Yarn C)
With C, join to any stitch around the visor edge, sc evenly around the entire visor edge, then join with a sl st to the first sc. FO and weave in the end.
Assembly and Finishing
Sew the visor to the front of the helmet first, then the Earth to the side, then the antenna and hanging loop to the top. Use small, even stitches and check placement before you knot off. Weave in all ends on the wrong side, pushing the tails into the stuffing so they stay hidden. Gently shape the bauble with your fingers and steam or lightly block the flat pieces (visor and Earth) before sewing if they curl. Let everything dry fully before hanging.
Pro Tips and Variations
- Swap the white for light grey or cream for a vintage space-suit look, or add a thin silver stripe around the helmet with surface slip stitch.
- Make the Earth in different colors for other planets, or leave it off for a simpler helmet ornament.
- Add a small embroidered star or two on the helmet with silver yarn for extra space detail.